
Author: GoFly
-
Which aircraft are better for flight schools, composite or metal?
-
Short-term memory limitations and how pilots can overcome these
It is important that pilots are aware of the limitations of short term memory in relation to reducing risk and communication errors when flying. A good example is when a pilot receives instructions from an air traffic controller. An air traffic control instruction can be detailed and be spoken very quickly.
If the pilot does not focus on the instructions or write the information down, there is a very good chance that the instructions will be forgotten.
What is short term memory
Short-term memory is responsible for temporarily holding and processing new information. When you are first told a new phone number for example it is stored in your short term memory.
Limitations of short term memory
The duration for which information is stored in short-term memory can vary, but it is generally thought to last between 15 to 30 seconds. The other major limitation is we can only store between 7 to 10 separate items in our short term memory at a time.
The relationship between short term and long term memory
Our long term memory is responsible for storing information for an extended period of time, ranging from days to years. It involves transferring information from our short-term memory to long-term storage, through what is known as encoding.
Encoding requires certain techniques such as visualization, repetition and attention, to transfer information from our short term memory to our long term memory.

How to minimise short term memory errors
There are many ways to minimise these memory errors. Below are some simple and effective methods to help boost your short-term memory. Many of these techniques involve actually transferring information from our short term to long term memory.
1. Focused attention
Give your full focus to the information you want to remember. Conducting a pre-flight with no distraction or telling a passenger to remain quiet when you are about to talk over the radio would be an example of preparing yourself to have focused attention.
2. Repetition
Repetition helps move information from short-term memory to long-term memory. An example of this is when new flight students are learning radio calls they verbalise radio calls over and over again (from a cheat sheet) until it becomes transferred to their long term memory.
3. Visualisation
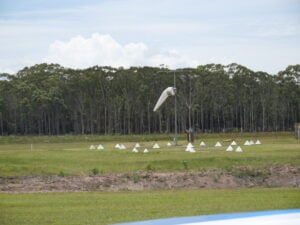
Create mental images or associations to help remember abstract information. A good example may be teaching students when they first see a windsock that it is like a pointy finger that always points to where the wind is going. This visualisation helps them remember orientation and how to read a windsock.
4. Write it down
If you are receiving a lot of information, the best way to minimise memory loss is to write it down. For instance, most pilots will write down an initial airways clearance as it can be quite complex and involved. This can be done on paper or on an electronic device.
5. Focus on Key Details
Identify the most crucial information and focus on remembering those key details instead of trying to memorise every single detail. For instance when receiving a new airways clearance, only write down critical information such as transponder codes, assigned altitude and headings.
Being aware of the limitations of the human brain, and in particular memory, is important in aviation, for mitigating risk and communication errors.
We hope you enjoyed this article. For more articles, free videos and books please explore the rest of the GoFly Online flight training website.
Happy and safe flying,
The GoFly Online Team
-
Why every good landing is a failed missed approach
Learning to land an aircraft is hard
When someone asks me: ‘Is it hard to teach someone how to land an aircraft?’, my response is always, ‘Landing an aircraft once you have mastered flying is not that hard, however, learning to land an aircraft ‘well’ and consistently safely, is hard and takes time, perseverance and patience – for both the student and instructor’.
I often joke that most flight schools would not be profitable if learning how to land an aircraft was easy. And if it was easy, it would not lead to such a great feeling of achievement once you have learnt how to land.
Notice how I did not use the term ‘master how to land’’. A pilot is always trying to master the landing and even with lots of experience a great landing can still be hard to achieve.
Teaching someone how to land takes, on average, anywhere from five to fifteen hours of circuit training before they are safe and competent enough to achieve their first solo flight.
What is a missed approach?
During the student’s circuit training the student is taught how to conduct what is known as a ‘missed approach’ which is also known as a ‘go around’.
A missed approach is where the pilot elects not to land at some point on final approach, then initiates full power and climbs back to the circuit height to conduct another circuit and approaches to try and land again.
A missed approach is conducted for many reasons, and some of these reasons are:
- The approach is not stable (i.e. the pilot has not sustained a constant approach speed, vertical speed and/or power setting)
- The pilot balloons or bounces when landing
- The pilot encounters severe turbulence on the final approach
- The cross wind exceeds the aircraft or pilot’s capabilities
- The pilot encounters birds or an animal on the runway
- Another aircraft has not cleared the runway prior to landing
The most common student errors when landing are listed below.
- Ballooning
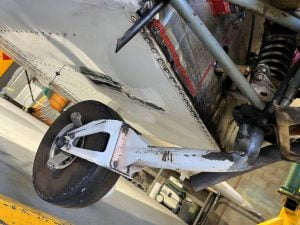
Ballooning is where the pilot pulls back too much on the control column and so starts to gently climb again just prior to touch down. If the student tries to land after a balloon, there is a chance the aircraft could stall close to the ground and the nosewheel could impact first (in a tricycle aircraft) causing damage to the aircraft.
- Bouncing
Sometimes a student lands too fast, or too flat and hard, and the aircraft bounces back into the air. Just like ballooning, the aircraft can run out of energy and airspeed quickly and stall close to the ground. Also if the student tries to land again they may inadvertently contact the nose wheel first (in a tricycle aircraft) and damage the aircraft.
- Not maintaining direction control or not landing on the centre of the runway
Sometimes students will land with the aircraft not being straight and parallel with the runway, and this can cause damage to the tyres and/or undercarriage. Or they might land off to one side of the runway with the potential to go off the runway.
Why pilots don’t conduct a missed approach
An obvious question to ask is, ‘Why don’t student pilots and experienced pilots conduct a missed approach when the approach or landing is falling outside the safe parameters for a landing?’
I find that the main reasons students pilot do not go around is their inability to identify that the aircraft has deviated from a normal approach and landing. I feel that the three main reasons experienced pilots do not conduct a missed approach are:
- The pilot has not mentally prepared themself to conduct a missed approach
- The pilot is too focused on completing the landing and prior successful landings have set an expectation in the pilot that even if external events disrupt a stable and safe approach they have the skill to still complete the landing.
- Pilot impatience
Every good landing is a failed missed approach!
When I was learning to land an aircraft around 36 years ago, my instructor told me to remember that ‘Every good landing is a failed missed approach!’ I never forgot that statement. While teaching a student how to land, and how to conduct a missed approach, is important, teaching a student to have the correct mindset and to be ready to conduct a missed approach is critical when it comes to safely landing an aircraft. There have been many accidents from both inexperienced and highly experienced pilots who have tried to land an aircraft when the safest thing to do would have been to conduct a missed approach and try again.
The pre-landing mental checklist

I like to teach students to conduct a pre-landing mental checklist, where the student has memorised this checklist and repeats it to themselves in their mind as they turn onto the final approach for landing.
The mental checklist is:
‘If my approach and airspeed is not stable, or if I balloon or bounce, or I can’t maintain the centre line, I will go around!’
During training, instructors will simulate balloons, and not landing straight, to see if the student can identify that the landing does not look correct and then elect to conduct a missed approach without prompting from the instructor.
When is the student solo ready?
One student might be able to land perfectly but not be ready for solo, while another student might be able to conduct safe but not technically perfect landings and be considered ready for their first solo. The difference between the two situations is that the student who is ready for their first solo flight, can:
- Conduct consistently safe takeoff circuits, approaches and landings during at least two lessons without any verbal or physical prompting from the instructor.
- Respond to an inflight simulated emergency without any prompting from the instructor
- Identify when the imminent approach and landing fall outside of safe tolerances and elect to conduct a missed approach, and can conduct that missed approach at any point on the final approach safely.
Expecting a missed approach reduces risk
My hope is, that the saying, ‘Every good landing is a failed missed approach’, will stay with the student for as long as they are flying. By having the student expect to conduct a missed approach and to know that landing is optional, enforces a behaviour and mindset that mitigates risk whether they are landing a Cessna, Boeing or Airbus.
Damien Wills, December 2022
-
How to never stall an aircraft
Most student pilots, and a lot of experienced pilots, fear stalling an aircraft. During initial training, stalling lessons are given high priority to ensure all students are aware of what an approaching stall looks like, and how to recover with a minimum loss of height if the aircraft does stall.
So what is a stall?
To put it very simply, a stall is caused when an aircraft’s wing exceeds a certain angle (the critical angle of attack) in relation to the airflow (known as ‘relative airflow’).
When this critical angle is exceeded, the airflow on the top of the wing becomes turbulent and a large amount of lift is lost. Most aircraft will lose a considerable amount of height during a stall unless proper recovery technique is initiated. A stall can, under certain conditions, also lead into a spin. A spin is bad news, particularly if you are low to the ground.
To give my students some context (and to reduce their anxiety) I ask them if they have ever planned on hitting a power pole when driving a car? Of course they all say ‘no’. I then advise them that inadvertently stalling an aircraft is like ‘inadvertently’ hitting a power pole. As drivers, we all know that if we stick to the road rules and drive safely in all conditions we mitigate our risk of losing control and hitting a power pole. The same can be said for stalling an aircraft.
Stall avoidance and pre-stall recognition are key
While being trained to recover from a stall is an important part of flight training, I believe stall avoidance is the most important aspect of flight training. Below I have listed some very simple rules that will prevent you from ever stalling an aircraft. If you keep to these rules, your odds of stalling an aircraft are greatly reduced.

- Are you safe? The first rule for all pilots before they go flying is to ensure they pass the minimum personal physical and mental checklist. This personal checklist is to ensure the pilot is not fatigued or stressed or have any physical health issues that could affect the safety of the flight. A common checklist for pilots is known as the IMSAFE checklist you can see in the image below.
- Know your aircraft. All pilots must know the limitations of the aircraft they are flying and this includes power settings, takeoff and approach speeds and stall speeds at all weights and aircraft configurations. If you don’t know the stall speed (limits) then how can you know when you are approaching that limit? This information is all contained in the Pilot Operating Handbook for your aircraft.
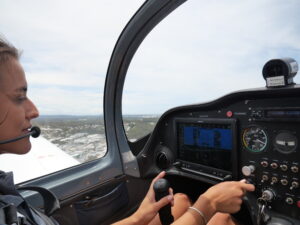
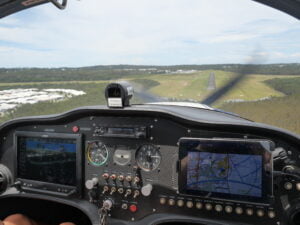
- Keep a good outside and inside scan! It is important that the pilot’s eyes are constantly scanning the horizon then quickly back to the primary instruments. This is called ‘the scan’. For visual flying, the pilot’s eyes should be on the physical horizon for most of the time, however, it is important they also keep scanning the instruments. The airspeed indicator is one of the critical instruments that the pilot’s eyes should constantly return to. When students allow their airspeed to get low (for instance on final approach) it’s normally because they are not scanning enough and are just focusing their attention on the runway.
- Trim the aircraft correctly. It’s important the pilot continuously trim the aircraft correctly to avoid excessive pitch forces during critical phases of flight. For instance, if the trim is not correct on take off, this will make it harder for the pilot to maintain the appropriate safe airspeed.
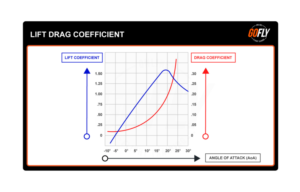
- Angle of attack is everything. An aircraft stalls when it exceeds its critical angle of attack. Put simply, if you never exceed the critical angle of attack then the aircraft will never stall. However, most light aircraft don’t have angle of attack indicators or the pilots may not fly using the angle of attack indicator. For simplicity, all aircraft have published stall speeds. For light aircraft the stall speed is normally based on the maximum takeoff weight and it varies depending on the flap setting. Understanding the relationship between angle of attack, attitude and airspeed is an important part of all pilot’s training. You can also see the relationship with lift and drag that occurs with the angle of attack of the wing on the graph below.
- Attitude and airspeed. During training it is important to ensure the student knows that constantly maintaining a healthy attitude and airspeed (well above the stall speed) will ensure the aircraft will not stall. As an instructor I also look for how quick a student reacts and corrects a diminishing airspeed particularly during take off and landing.
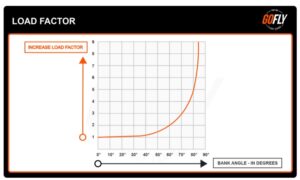
- Understand load factor, weight and balance. Understanding the effect that weight has on the stall speed is critical. A heavy aircraft will stall at a higher speed compared to the same aircraft at a lower weight. It’s also critical to understand that how you load the aircraft (balance) can also affect the stability and stall speed. Load factor is caused by acceleration forces that occur when an aircraft either turns sharply or conducts abrupt maneuvers. When an aircraft is flying level it is experiencing 1G of load factor or one times the force of Gravity. However in a coordinated turn, the forces that maintain the turn increase and this increased force or acceleration is translated into what is known as a ‘G force’. For instance, in a 60 degree angle of bank coordinated turn the aircraft and crew are experiencing 2G or twice their normal body weight. This also has the effect of increasing the stall speed. In this scenario the stall speed is increased by 40%. If the published stall speed is 50 kts in level flight, in a 60 degree steep turn it will now be 70 kts (ouch). All pilots need to understand the effect of G loading on stall speed and never to ‘load the aircraft’ when flying at low speeds or low to the ground. Basically this means to not do any steep turns at low speed and low to the ground. See the load factor graph below, to understand how bank angle affects load factor.
- Allow a healthy buffer above the stall speed. This one is fairly straightforward, unless you are in the final phase of landing, always allow a large buffer above the stall speed when flying. A good rule of thumb is never below 1.3 times the stall speed. However, unless landing or conducting stalls or short field takeoff and landing practice, I suggest to students they should never fly below the aircraft’s best glide speed for added safety.
- Stick to the published operating speed always. If the Pilot Operating Handbook advises that the approach speed is 70 kts at gross weight, then do NOT alter from this speed. They are published in the Pilot Operating Handbook for a reason.
- Stable base and final approach. Ensure you do not overshoot the runway when turning from base to final and if you do, consider conducting a missed approach. Ensure the correct approach speed is maintained on the base to final turn. Ensure that the final approach is stable, meaning a constant rate of descent and safe and constant approach speed and tracking towards the middle of the runway correctly. If you cannot maintain a stable approach then consider conducting a missed approach.
- Retract flaps slowly, in stages and accurately. Depending on aircraft type, raising flaps either after take off or during a missed approach needs to be done carefully, in stages, accurately, and at the correct time. Retracting flaps results in a loss of lift and a pitch change. This could lead to a stall if not done correctly. It is important to ensure that you have a safe flying speed well above the stall before tracting flaps.
- Identifying deteriorating flight envelope. As previously mentioned, an important aspect of training is that the student is able to identify an approaching stall. These warning signs should be hard wired into all pilots. If for instance the approach starts becoming unstable then conducting a missed approach early. Airspeed reducing on final, below the published approach speed, should be noticed and corrected immediately.

- Allowing for weather. It would be insane to conduct a short field landing with a 30 knots gusting wind in a light aircraft. This comes back to knowing your aircraft and your own limitations and once again adding a buffer to add a margin of safety. If the weather conditions are beyond your experience or comfort levels cancel the flight or book an instructor to fly with you.
- Aviate, Aviate, Aviate. All pilots have heard the statement: Aviate, Navigate, Communicate. A lot of stall accidents occur because this simple list of priorities has broken down. During landing and takeoff, the priority should really be Aviate, Aviate, Aviate.
- Be prepared for an emergency and FLY THE PLANE. Conducting an emergency brief to yourself before takeoff will reduce the chances of stalling the aircraft if the worst should occur such as an engine failure after takeoff. For instance, on takeoff a common brief is to tell yourself before take off ‘If the engine fails after takeoff and before [a certain height] I will adopt the best glide and NOT turn back towards the runway.’ This simple brief ensures that you react quickly and make the best decision, should the worst occur.
- Currency. There is no point in knowing all the basic rules of avoiding a stall if you do not fly enough to remain current on your aircraft type. Regular flying and regular dual refresher training is what keeps pilots safe and competent. I recommend all pilots conduct some type of refresher training every six months to work on areas where they are still not feeling confident.
Summary
So, to sum it up, if you want to avoid a stall when flying a plane, do these things:
- Ensure you are mentally and physically fit to fly
- Know your aircraft published speeds in all configurations
- Understand the effect that weight and balance has on stall speed.
- Conduct safety and emergency briefs before take off and landing.
- Maintain a good and continuous horizon to instrument can.
- Stick to the published takeoff and approach speeds
- Do not conduct turns above 30 degrees in circuit or during an approach
- Do not conduct more than a 15 degree turn in a climb
- NEVER allow the airspeed to get below the take off climb speed after take off.
- NEVER allow the airspeed to get below the approach speed until the landing phase (flare).
- Retract flaps slowly (in stages ) above a safe flying speed.
- Continuously trim the aircraft
- Conduct a missed approach if you overshoot the runway
- Conduct a missed approach if the final approach is not a stable approach
- Ensure you are flying regularly and remaining current on your aircraft type.
- Cancel the flight if the weather conditions (wind or visibility) is beyond your experience or comfort level
- Grab an instructor for some refresher training every six months to work on your weaknesses and to improve your flying skills.
Obviously the more training you do the safer and more competent you will become. Slow speed flight and upset recovery training are also excellent ways to increase your confidence and can be conducted safely at high altitude with a competent instructor. Stalls (just like telegraph poles) should never be feared if you have the right training, know the rules, have a disciplined approach to your flying and if you stay current.
To sample all of the videos, theory books, practice exams and blogs on www.GoFly.Online, sign up for the 7-day free trial.
-
Why understanding wind gradient is important when learning to land a plane
Teaching a student how to turn, and to climb and descend is not too hard, but teaching a student to land an aircraft takes time. All flight instructors and students would prefer to learn the art of landing while experiencing as little wind as possible.
Adding wind into the mix makes it harder for the student to master the final landing sequence, particularly if there is any crosswind or gusts of wind. One of the many challenges students face when learning how to land an aircraft is understanding ‘wind gradient’, which is also known as ‘wind shear’. So what is wind gradient?
WIND GRADIENT (OR WIND SHEAR)
Wind gradient is basically a change of wind direction and speed over a vertical or horizontal distance. Wind gradient or shear can exist when two different airstreams meet.
For instance, if an aircraft is climbing through 3,000 feet and the wind at 3,100 feet changes from a westerly wind to a northerly, the difference in the direction of the airflow of these two wind directions in a small amount of distance can cause turbulence known as wind shear.
When landing, the most common form of wind shear is due to the frictional forces of the ground causing the wind speed to decrease as the wind gets closer to ground level.
For instance at 1,000 feet the wind may be 20 knots. However, at just three feet above the ground – due to the frictional forces of the ground – the wind may only be five knots.
This change in wind speed as you get closer to the ground can affect the aircraft on final approach and care must be taken to ensure the pilot is aware of the effect of decreasing wind strength on the aircraft’s airspeed.
Wind shear can also be experienced as a sudden drop in airspeed followed by an increased rate of descent.
And during a climb, or just after takeoff in strong winds, wind shear can also be experienced as a sudden increase in airspeed followed by an increase in rate of climb.
The pilot needs to be aware of the potential sink and loss of airspeed and make sure a healthy attitude and airspeed is always maintained during final approach, with power ready to control the sink rate.
Wind shear can be severe, such as wind near a storm, however for today’s purposes we are only going to discuss light wind shear or wind gradient in relation to final approach to land, when the wind is blowing between 10 to 20kts.
THE FIRST TIME A STUDENT ENCOUNTERS WIND GRADIENT
In nil or little wind, the student has been taught to ensure the aircraft has a stable approach prior to landing. This means a stable indicated airspeed, a stable rate of descent and a stable approach profile.
In nil wind this is normally quite easy to achieve once the student is used to the correct site picture of the runway on final approach.
However if we add 15 kts of headwind the student will notice on final approach that if they keep maintaining the same approach profile the airspeed will start to decrease as the aircraft descends.
This is because the wind strength starts to decrease as the aircraft gets closer to the ground and if the aircraft attitude and approach profile is not changed, the result will be a decrease in indicated airspeed.
When airspeed is decreased (if no pitch change occurs) the lift also decreases and this may also result in an increase in the rate of descent.
If the student does not change the attitude, the airspeed may get dangerously low on final approach.
THE CORRECT PROCEDURE WHEN EXPERIENCING WIND GRADIENT ON FINAL APPROACH
The correct procedure (in a light training aircraft) would be to adjust the attitude (pitch) to maintain the correct approach speed, then adjust power to ensure the rate of descent does not increase (keep in mind that for larger high inertia aircraft, power would be used to correct a reduction in airspeed).
When a student first encounters this (if they have been taught to maintain airspeed with attitude) they will pitch the nose down to maintain a healthy approach speed, however this steepens the approach profile and in most instances they will now be aiming short of the runway.
The only way to correct this is to apply power to change the rate of descent to get back onto the desired approach profile.
When a student pilot first encounters a strong wind gradient on final approach it can be quite frightening, however as they gain experience they learn to anticipate and to keep adjusting the aircraft’s altitude, airspeed and power continuously to maintain the correct approach profile as they descend towards the flare point.
SEVERE WIND SHEAR
Occasionally a pilot and student pilot/instructor may experience a severe wind gradient, where the indicated airspeed reduces dramatically and the rate of descent increases dramatically. In this instance a missed approach (go around) should be initiated immediately.
WIND GRADIENT IS ALWAYS PRESENT WITH WIND
Remember, wind gradient will always be present if there is wind present. In most instances, wind gradient or shear (below 20kts of wind) is easy to manage providing the pilot has had proper training and understands the aircraft and their own limitations.
For more videos, books and quizzes to help you pass your flight tests and become the best pilot you can be, explore the rest of the great content on www.gofly.online
-
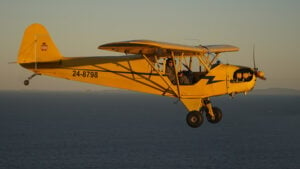
Is it better to learn in a high-wing or low-wing aircraft?
Is it better to learn in a high-wing or low-wing aircraft ?
As a flight instructor, and having had both high and low-wing training aircraft used in our flight school over the last twelve years, I often get asked, ‘Is a high-wing or low-wing aircraft better for students to learn in?’
While I have my personal preference, for now, I will stick to the facts and let you make your own decision.
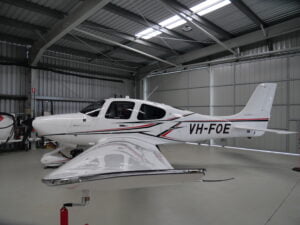
The main benefits of a high wing include:
Easier to board the aircraft
Unlike in a low-wing aircraft, you simply open the door and climb up the step and into the aircraft, just like climbing into an SUV. While this may be challenging for some, typically it is a lot easier than getting into a low-wing aircraft. If the student or pilot is elderly then a high-wing aircraft has a lot of benefits.
More stable
High-wing aircraft are more stable than a low-wing aircraft as the centre of gravity sits below the wing and this acts like a pendulum.
More shade
High-wing aircraft can offer more shade than low-wing aircraft. If you’re learning to fly in a hot environment, then a high-wing aircraft usually offers more protection from the sun as the wing is positioned above the cabin. If you attend a fly-on event. you can also sit or sleep in the shade from the wing.
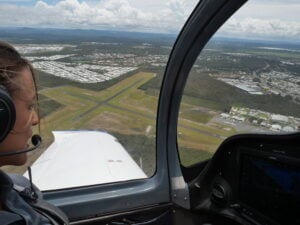
Direct view below the aircraft
High-wing aircraft allow a better view of the ground directly under the aircraft.
The main disadvantages of flying in a high-wing aircraft, include:
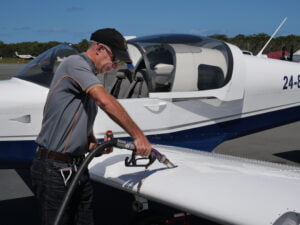
Fuelling
High-wing aircraft are harder to fuel as the fuel caps are situated on top of the wing and one has to pull the fuel hose up over shoulder height.
Visibility
In a high-wing aircraft it can be more difficult to see other aircraft, particularly during a turn as the high wing can block the pilot’s field of vision.
The advantages of using low-wing aircraft include:
Fuelling
There is no ladder required and it is easier to fill the aircraft’s low wing.
Visibility
There is better visibility for other aircraft, particularly when during a turn as there is no wing to block the pilot’s field of view at eye level).
Inspection of fuel caps
When doing pre-takeoff checks, the fuel caps can be inspected again before take off (this cannot easily be done in a high-wing aircraft).
The disadvantages of using low wing aircraft:
Boarding the aircraft
Low-wing aircraft are usually harder to climb into than high-wing planes. With most low-wing planes you have to step up onto the wing, then carefully enter the cockpit from above and lever yourself down into the seat without putting any weight on any part of the canopy. Getting out can be just as hard and requires a reasonable amount of arm and leg strength to lift your own weight.
Stability
Low-wing aircraft are not as stable as high-wing aircraft and are usually more responsive in pitch and roll. This can mean it is more exciting to fly, but it also makes it harder for a new student to learn.
Direct view below
With a low-wing you cannot see directly underneath the aircraft as the wing is in the way of the pilot’s field of vision.
Ground effect
Another factor to consider between the two types is ‘ground effect’. Ground effect is the effect of reduced ‘induced drag’ on the proximity of the wing to the ground on landing. Less drag means the aircraft will float more and have a longer landing roll and a shorter take-off roll. A low-wing aircraft wing is closer to the ground, so it experiences more ground effect and therefore normally experiences a longer ground roll and shorter take off roll than a similarly-performing high-wing. There are no real advantages or disadvantages with ground effect, but it is important to be aware of the differences.
My personal opinion
I learned to fly in a high-wing Cessna 150 over 30 years ago and I used high-wing aircraft when I first started our flight school. I now only operate low wing aircraft in the school. I believe the high-wing aircraft offers a few more practical advantages than a low-wing aircraft, however I have four main reasons why I now prefer the low-wing aircraft for training.
- Low-wing aircraft are easier to fuel. Having a busy flying school, we need to fuel aircraft quickly and get them back in the air as soon as possible. High-wing aircraft take longer to fuel as you need to fetch a ladder every time you fuel.
- As almost half of ab initio (initial) flight training is conducted in the circuit area, being able to see and avoid other aircraft is critical. Low-wing aircraft make it easier to spot aircraft in a busy circuit environment.
- They are more responsive than high-wing aircraft. I know that initially this may make it harder when learning to fly, but flying a low-wing is generally more responsive and less stable in pitch and roll, and this makes it, in my opinion, more fun to fly.
- Low-wing aircraft look cool. This is just my opinion. I just love the look of them.
While I prefer low-wing aircraft, I still love flying high-wing aircraft and if I was travelling around Australia in summer, or if my passengers were older and less mobile, I would definitely choose a high-wing aircraft. I’d love to test fly a high-wing Sling in the future.
If you are considering learning to fly, I would suggest you do not worry about whether it is a high-wing or low-wing aircraft. When choosing a flight school the important things to consider are the quality of the training, the age and condition of the aircraft and how customer-focused and passionate the instructors are.
Damien Wills, Aug 2022
The GoFly Online team wants to help you become the best pilot you can be. You can access all of our flight training videos, practice exams and theory books with the 7-day free trial.
-
Why VFR Pilots should always plan for an alternate aerodrome
What is an alternate aerodrome?
An ‘alternate aerodrome’ is another aerodrome other than the departure or destination aerodrome, that the pilot in command has selected to fly to, should the destination aerodrome not be suitable for a landing.
If an alternate aerodrome is required, the pilot in command must ensure there is enough fuel to fly from the planned destination aerodrome to the alternate aerodrome and still land with the required minimum amount of fixed reserve fuel on board the aircraft.
Why do we need to have an alternate aerodrome?
The main reasons an alternate aerodrome might be required is because the destination aerodrome has either no valid weather forecast, or the weather is forecast to reduce below the minimum required for a visual flight rules (VFR) flight. In Australia the conditions and rules can be located in the VFRG (Visual Flight Rules Guide) chapter 2 and CASR 91.235 and MOS 8.04.
It is also important to note that all alternate aerodromes must have a valid weather forecast and the weather conditions must also be above the minimum required for VFR flight.
When an alternate aerodrome is not required
There are certain conditions where an alternate aerodrome is not required and a few of these conditions include:
- When flying VFR within 50 nm of the aerodrome
- The weather conditions deteriorate below VMC conditions for a period of time at the destination aerodrome and you have enough holding fuel until conditions improve to above VMC.
Why not always having an alternate aerodrome is a bad idea
While legally you may not be required to have an alternate aerodrome, there are two main reasons (facts!) why I think it is prudent to always plan for an alternate:
- The weather forecast is not always correct.
A weather forecast is a forecast and it is not always correct. While the forecast may state that the VFR conditions will be above the minimum required occasionally this can be wrong. It’s always better to have an alternate selected on the rare occasion this happens to you when flying.

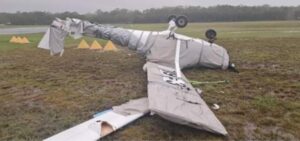
- The destination aerodrome may be closed due to an incident or accident
This is the biggest reason you should always plan to have an alternate. Unfortunately incidents and accidents occur and occasionally they occur during the landing phase of flight. A landing incident may close a runway for a couple of hours or if serious the entire day. I have personally had this happen to me twice over the last ten years where I have had to divert to an alternate aerodrome due to a landing accident at the destination aerodrome.
Even if you are flying locally, plan to have an alternate aerodrome
For the two reasons mentioned above – in particular an aerodrome closing due to an incident or accident – I always recommend planning an alternate aerodrome even if flying locally. Imagine if you decided to take your family for a local flight, only to return to the aerodrome to discover that it’s been closed due to an aircraft having a very hard landing, and you only had on board the minimum fixed fuel reserves for your flight (i.e 30 minutes reserve in Australia). You’d be in trouble.
It does not take too much time to always plan for an alternate aerodrome and it will give you that extra level of comfort knowing you have a plan should the worst occur. I love the statement: ‘prepare for the worst and expect the best’ when it comes to planning your flight.
For more information about nav and flight planning, why not take a look at our Navigation for the Recreational Pilot Easy Book.
Happy and safe flying.
-
Why pilots and passengers get motion sickness and how to avoid it
The reality is that most pilots and passengers in light aircraft have felt the effects of motion sickness at some point in their lives. It might have been just a slight feeling of uneasiness or it could have been a full-blown projectile event.
Understanding what causes motion sickness and how to avoid it, is very important for both pilots and passengers so they can mitigate the risks that are associated with sickness when flying a light aircraft.
What causes motion sickness?
Motion sickness is caused by conflicting information sent by your eyes and vestibular system. Motion sickness can occur on any object that is moving but is generally most commonly experienced on a boat, vehicle or aircraft.
A good example of this is when you fly through light turbulence, and your eyes are looking at the horizon and do not sense any movement, the information from your eyes is telling the brain that no movement is occurring and you are at rest.
However the vestibular system in the inner ear (more about this soon) is telling the brain that there is movement. The conflicting data to the brain can cause motion sickness.
Balance
The inner ear is also very important as it contributes to our sense of balance. Most of our balance comes visually from our eyes but the ears also contain a balance mechanism to support our vision and as a backup to maintaining balance.

The vestibular system
The vestibular system is located in each inner ear. The system contains semicircular canals that contain a fluid with tiny hairs that can detect movement, on the inside of the canals. These hairs send information to the brain to help assist with balance.
This information helps the brain work out whether you are moving backwards or forwards, up or down, and whether you are lying down or standing up.
While the inner ear balance system is a great back up system it cannot be solely relied upon, particularly when flying. When flying, the aircraft experiences acceleration and deceleration forces that can cause the inner ear fluid to misinterpret the information and send the wrong information to the brain.
Each ear contains three semicircular canals and these are roughly positioned at right angles to each other. They are aligned this way so they can detect movement in three dimensional space.
Some of the early warning signs for motion sickness include sweating and the individual may become quiet and pale.
Symptoms of motion sickness include:
- Pale skin
- Feeling nauseous
- Increase in sweat
- Loss of appetite
- Dizziness
- Inability to concentrate
- Shallow breathing
The dangers of motion sickness
For pilots, motion sickness is a real threat that must be avoided as much as possible.
Even slight motion sickness affects the individual’s cognitive function and ability to concentrate on any task. Severe motion sickness could actually lead to total pilot or passenger incapacitation.
Avoiding motion sickness
Eating a light meal before flying, and avoiding dairy food, is one way of reducing motion sickness. Also ensuring the cockpit is well ventilated and – for VFR pilots – that your eyes are on the horizon for the majority of the time, is helpful. Try not to make any abrupt head movements that could also disrupt the vestibular system.
Pilots are not allowed to take most motion sickness medication, but ginger tablets are a natural remedy which can be used in moderation and may prevent or reduce the effects of motion sickness. The good news is that over time, most student pilots build a tolerance for motion sickness and the symptoms eventually disappear.
Only take passengers flying on calm days
If you are taking a first time passenger for a flight, please don’t take them on a day with high winds, severe heat and or turbulence. It is a sure way to ensure the sick bag will be used and they will never want to fly with you again!
Fly the plane like an airliner (no abrupt flying)
If you are an instructor and do not want your student to get sick, or if you are a pilot and don’t want your passenger to get sick, this one is the easiest method I know to avoid air sickness. My recommendation to all pilots and flight instructors (other than when doing stall and steep turn lessons) is to fly the aircraft like a mini airliner jet. When you fly in an airliner there are usually no abrupt movements.
Climbs and turns are always made gently and slowly. This gives time for the vestibular system to catch up with what the eyes are seeing. Quick abrupt movements are a sure way to get everyone sick very quickly!
What to eat before flying
It is a misconception that having an empty stomach will help the body avoid air sickness. Having no food in your stomach is a sure way of getting motion sickness.
Being well hydrated and having something light to eat before flying is very important. Any oily or fried food and any dairy foods should be avoided. Foods such as bananas, breads, almonds and crackers are examples of foods that can assist in decreasing the chances of getting air sickness.
Treatment of motion sickness
It is also a good idea to take sickbags in the aircraft in case any passengers experience air sickness. If you or your passenger experience motion sickness, try to relax and get as much fresh air as possible. If you are flying with an instructor, inform your instructor.
Do not conduct any abrupt manoeuvres and keep your eyes on the horizon until the air sickness passes. Once you are on the ground, the quickest way to recover from the effects of motion sickness is to ensure you are well hydrated and to lie down in a cool dark room.
The good news is, you will get used to it (eventually)
The majority of pilots (myself included) eventually adjust to the effects of flying. Passengers may not, as they may not fly enough in light aircraft to overcome the effects of motion sickness, this is why flying on a calm day with no abrupt movements is so important when flying with passengers.
The more your senses are exposed to flying in three dimensions, the more the effects of motion sickness will reduce. I have known airline pilots and air force fighter pilots who suffered severe air sickness during their early training and eventually their bodies adjusted and they no longer experience air sickness.
Flying can be fun and rewarding. The more knowledge the instructor or pilot has about motion sickness avoidance, the more likely students will continue their flight training and become a student pilot themselves.
The GoFly Online Team wants to help you become the best pilot you can be, please try our free 7-day trial to access all of our flight training videos, theory books and practice exams. Happy and safe flying.
-
Why all pilots need to understand the ‘region of reverse command’
Unfortunately loss of control accidents are very common during take off and landing.
Many of these accidents could have been prevented if the pilot had a better understanding of slow speed flight and what is commonly known as the ‘region of reverse command’.
Region of normal command
Before we talk about the region of reverse command, let’s look at the ‘region of normal command’.
The region of normal command is where most aircraft spend most of their time, that is, in standard climb, level flight and descent.
In this region, an increase in airspeed causes an increase in parasite drag (drag caused by the structure of the airframe interacting with the relative airflow) and a decrease in induced drag (drag caused by lift).
To put this another way, in the region of normal command, when you pitch the nose up the aircraft’s airspeed decreases and the aircraft climbs; and when you pitch the nose down, the aircraft’s airspeed increases and the aircraft descends.
Region of reverse command
The region of reverse command is encountered at low airspeed. It is also known as the back of the power curve, and is normally situated below the max endurance power and airspeed combination for the aircraft type. This region is always encountered during take off and landing.
The aircraft is not behaving like it should!
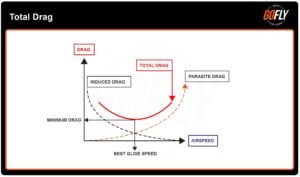
In the region of reverse command, any decrease in airspeed will see an increase in total drag, and any increase in airspeed will see a decrease in total drag.
The graph below highlights what is actually happening. As you can see, at a certain airspeed, the total drag starts to increase again as the airspeed decreases.
This is the reverse of what happens at higher airspeeds, hence the term ‘region of reverse command’.
Low and slow on final
Imagine a pilot allows the aircraft to get low and slow on final approach and the airspeed enters the region of reverse command.
If the pilot decides to pull back on the controls to gain height, the total drag will increase and so will the rate of descent.
The pilot will be expecting the aircraft to climb but it may actually descend.
If the pilot was using a substantial amount of power (such as a short field approach) there may not have enough power available to arrest the sink rate and not enough height below the aircraft to pitch the nose down to increase the airspeed.
Things can get ugly quickly on takeoff!
Let’s assume a pilot is conducting a short field takeoff with full power and, due to a wet runway, the take off distance increases.
Just after takeoff the pilot notices trees at the end of the runway and is worried that they may not be able to climb over the trees even though they are climbing at the best angle!
To try to avoid the trees, the pilot pitches the nose up slightly to try and increase the climb angle to get over the trees. Unfortunately, by doing this, the airspeed decreases below the best angle of climb and into the area of reverse command.
At this airspeed, any decrease in airspeed will see the rate of climb decrease (as total drag is increasing) and potentially the aircraft will actually start to descend (or worse, stall).
As the aircraft is delivering full power there is no longer any available power to improve the rate of climb or airspeed.
The only way to improve your climb rate is to actually lower the nose to increase the airspeed before attempting to climb again (which is a hard thing to do if you can see trees heading towards the windshield!)
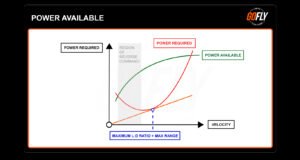
The relationship of power overcoming drag also reverses
If you look at the graph below you can notice that above the best ‘lift to drag ratio’, more power is required to increase the airspeed (to overcome drag), until it reaches a point where there is no more power available (maximum level flight speed).
However, below the best ‘lift to drag ratio’ line, more power is required to maintain level flight, as the airspeed decreases until it reaches a point at a very low airspeed (normally near, or at, the stall) where there is no more power available to maintain level flight.
Here are some simple rules on how to avoid unrecoverable situations in the region of reverse command.
Know your aircraft’s limitations
It is important to know your aircraft’s correct airspeed and limitations by reading the POH (Pilot Operating Handbook).
For instance, if the short field take off and landing airspeed is 65kts, then under no circumstance should you ever allow the aircraft to get below this speed! This also means understanding the performance and weight and balance charts for your aircraft type so you never have to put yourself and your passengers in a marginal situation with no buffer.
Ensure a stabilised approach
A stabilised approach includes a stable approach speed, stable rate of descent and the correct approach profile. If any of these variables are not met, particularly below 200 feet, conduct a missed approach.
Do not fly below best angle airspeed (VX) on take off
For takeoff, ensure the aircraft does not adopt the climb attitude until the airspeed can maintain the minimum safe climb altitude and airspeed.
Slow speed flight and approaching the stall
The best technique is always to avoid a stall. Proper initial training plus refresher training with a qualified instructor on slow speed flight and stall avoidance is very important.
Know your own limitations
If you have not done a short field takeoff or landing for a long time and you’re not feeling confident doing one, then don’t! Find an appropriate flight instructor and do some refresher training to ensure you are confident before conducting these types of takeoffs and landings on your own.
If you balloon or bounce on landing conduct a missed approach
For most light aircraft and in particular light sport aircraft, if the aircraft balloons or bounces on landing, the best decision is to conduct a missed approach. The aircraft is usually already in the region of reverse command on landing and any attempt to try and recover at this low airspeed with insufficient height below you, is very dangerous.
Applying full power and allowing the aircraft to accelerate to a safe climb speed is always the best option.
Slow flight does not have to be dangerous
If slow flight is conducted within the designated limitations of the Pilot Operating Handbook by a qualified and current pilot, it does not have to be dangerous.
Understanding the how, what and why of the ‘region of reverse command’ is the first step in avoiding a negative outcome!
Happy and safe flying and see you next time on GoFly Online.
The GoFly Online team wants to help you become the best pilot you can be. You can access all of our flight training videos, practice exams and theory books with the 7-day free trial.
-
What documents do pilots need to carry on board the aircraft when flying?
What documents do pilots need to carry on board the aircraft when flying?
It is important for all pilots in Australia to know what documents they must legally have on board the aircraft when flying. It can be quite confusing understanding the legal requirements and where to find the most up to date legislation in relation to documentation requirements.
As the pilot in command, knowing these requirements will not only ensure you meet your legal obligations but also give you peace of mind should you get a ramp check or spot audit from CASA or Recreational Aviation Australia (RAAUS).
Here is a list of items that need to ALWAYS be carried on an aircraft when flying in Australia for day VFR flights. These references can be located on CASR 91.105, 91.110 and the Recreational Aviation Australia Operations Manual and VFRG.
Flight Crew licence
A Pilots Licence holder must have a valid Flight Crew licence on them at all times.
If they have a Recreational Pilot Certificate with RAAUS, while it is a good idea to have the Certificate on you, it is not a legal requirement. As per the RAAUS Ops Section 2.03, Recreational Pilot Certificate holders only have to produce the documentation within 72 hours of being requested by RAAUS or CASA.
Medical Certificate
For a CASA pilot licence holder, it is a requirement to have your Medical Certificate on you at all times.
For a Recreational Pilot Certificate, if you are required to have a medical certificate, then once again, as per the RAAUS Operations Manual, the pilot has 72 hours to produce the document if requested by RAAUS or CASA.
Photographic ID
All pilot licence and certificate holders are required to have photographic ID on them at all times. This can be a passport, an ASIC card or a driver’s licence.
Flight Manual or Pilot Operating Handbook (POH)
The aircraft Flight Manual or Pilot Operating Handbook must be on board the aircraft at all times.
Minimum equipment list for the aircraft type
If your aircraft type has a minimum equipment list, this equipment must all be onboard the aircraft. This list is often contained in the flight manual or Pilot Operating Handbook or could be a requirement for a particular commercial air operation.
Not required if doing aerobatics
There is an exemption from having to carry these documents if you are performing aerobatics and the documents could interfere with the safe operation of the aircraft.
Recreational and light sport aircraft
As per CAO 95.32 and 95.55 and the RAAUS Operations Manual, each aircraft must have a means of ascertaining current registration and valid airworthiness. This would normally mean a registration certificate on board and a type certificate, or for LSA aircraft, a special Certificate of Airworthiness on board the aircraft.
Other exemptions
As per CASR 91.110, the documents below are exempt from being carryied on board an aircraft, providing the flight is conducted within 50NM of the departure aerodrome flying within or traveling to and from a training area. These documents include
- Technical Log or Maintenance Release
- Authorized aeronautical information for the flight
If we look at this another way, if you are planning to depart from the departure aerodrome for more than 50NM or outside a training area then the aircraft must carry its Maintenance Release sheet. The aircraft must also have the relevant aeronautical information such as maps and other documents required to safely conduct the flight.
Do pilots need to have their Logbook with them?
As per CASR 61.345 and RAAUs Ops Manual 2.03, a pilot logbook is not required to be carried on board an aircraft. However, for Pilot Licence holders, the logbook must be presented to CASA within 7 days if requested by CASA. For RAAUS Pilot Certificate holders, the logbook must be presented within 72 hours if requested from Recreational Aviation Australia.
Documentation checklist
It is a good idea to have your own documentation checklist which is particular for your licence or certificate type, that you check every time you go flying. The checklist will also vary depending on whether you are flying within 50nm or the training area.
***
The GoFly Online Team wants to help you become the best pilot you can be. Feel free to take a look at our flight training videos, practice exams and theory books by signing up for the FREE 7-day trial at www.GoFly.Online
7 Day
FREE
Trial
Get access to the complete catalogue of your chosen subscription level for 7 days. After your free trial, your paid subscription automatically commences. Cancel anytime.
Get FREE TrialOur
Partners